Installing the Archive Package
Table of Contents
- Prerequisites
- Install the Package
- Create a New Named Credential
- Create and Assign a New Permission Set
- Create a New Archive Object
- Sync Archive Objects
- Configure an Archive Object
- Lightning Pages Administration
- Widget Administration
- Salesforce Experience Configuration
- Troubleshooting
1. Prerequisites
Before you begin, make sure you have the following:
- A link and a password to install the package: These will be provided by Bluefactory after you purchase the Archive Module.
- A login and a password to access the external data source: These will also be provided by Bluefactory.
2. Install the package
To install the package, follow these steps:
- Use the password provided by Bluefactory to install the package.
- Select an option for installation: Admins Only. This option allows only admins to install the package.
- Click on the "Install" button.
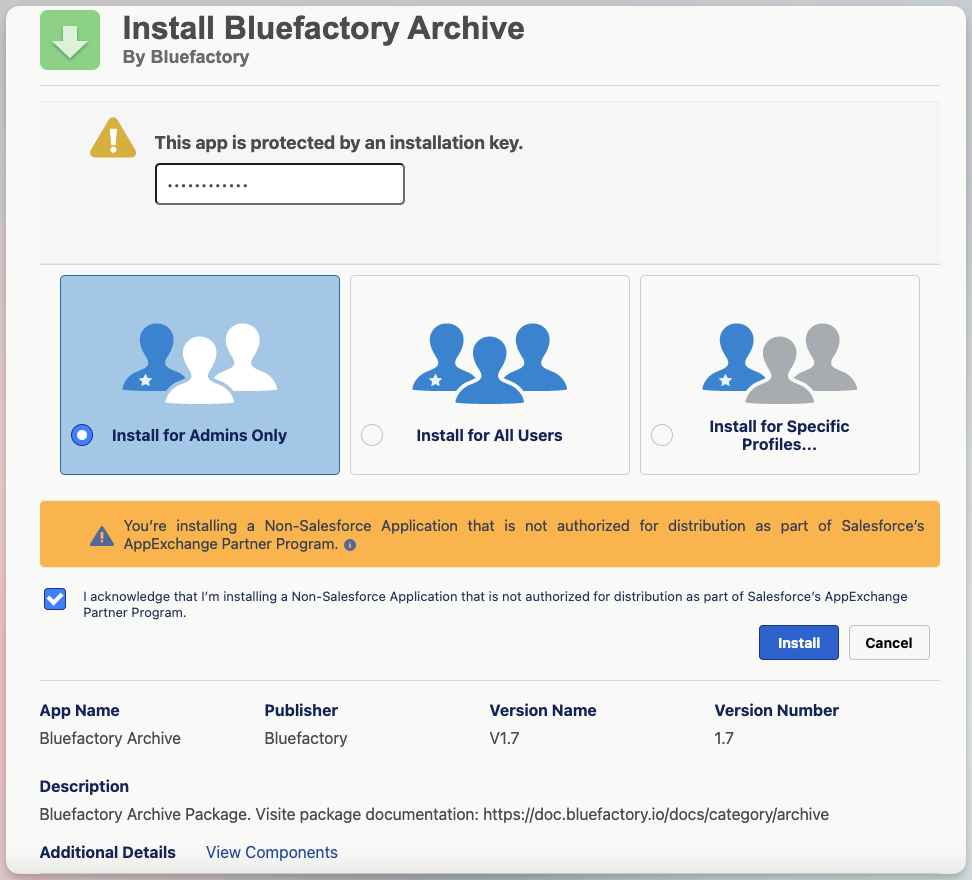
If you encounter any errors during installation, check the Troubleshooting section below.
3. Create a new Named Credential
Named Credentials are a safe way to store authentication data for external services. In this step, you'll create a Named Credential for the Bluefactory Connector.
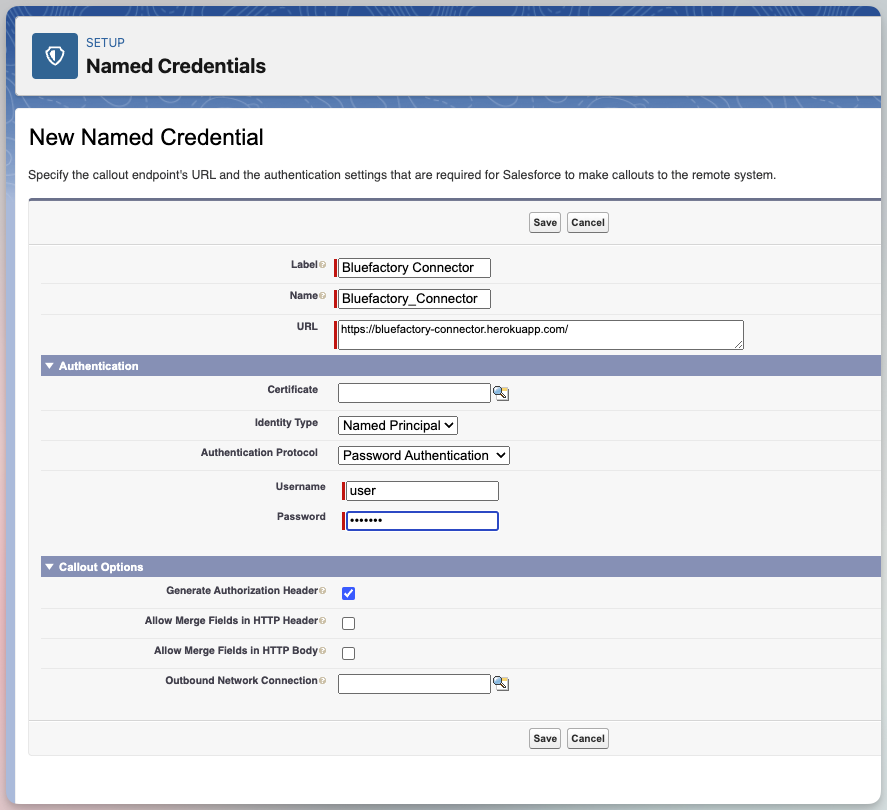
In the Salesforce Setup, search for "Named Credentials" and click on "New Named Credential":

Create a Legacy Named Credential, with the following parameters:
- Label: Bluefactory Connector
- Name: Bluefactory_Connector
- URL: https://bluefactory-connector.herokuapp.com/
- Identity Type: Named Principal
- Authentication Protocol: Password Authentication
- Username & Password: Provided by Bluefactory
4. Create and assign a new Permission Set
Permission sets are used to grant specific access levels to different users. In this step, you'll create a permission set for the admins.
You need to create at least one permission set for the admins. The permission sets are used to show a list of specific list for the users who have the assigned permission.
- Create a new permission set (example: Bluefactory Archive Admin)
- Assign the permission set to your user

In the section Configure an Archive Object, you will see how to use the permission set to configure the access policy.
5. Create a new Archive Object
An Archive Object is a specific set of data that you want to archive. Follow these steps to create a new Archive Object:
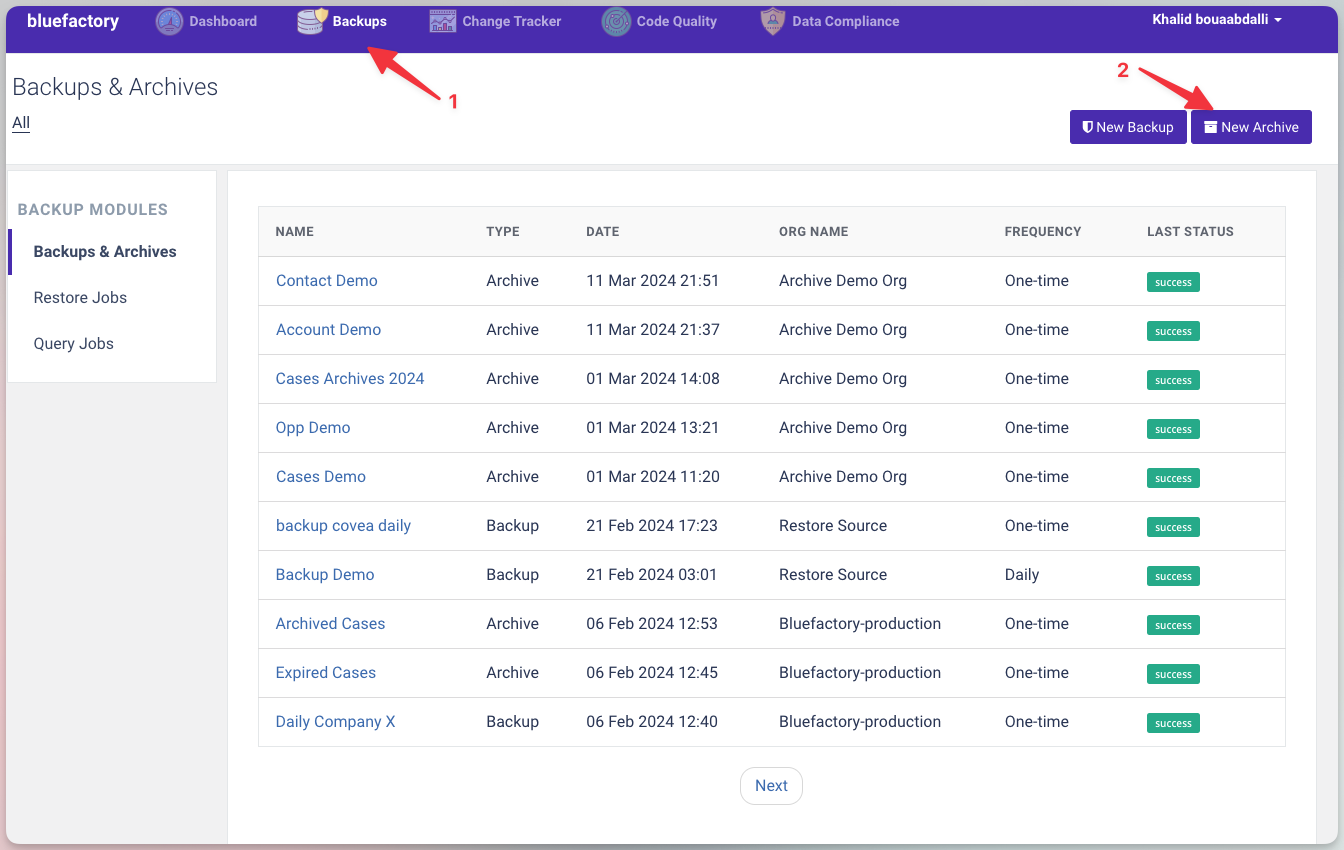
- Login to your bluefactory account
- On the header, click on the “Backups”
- Click on “New Archive”
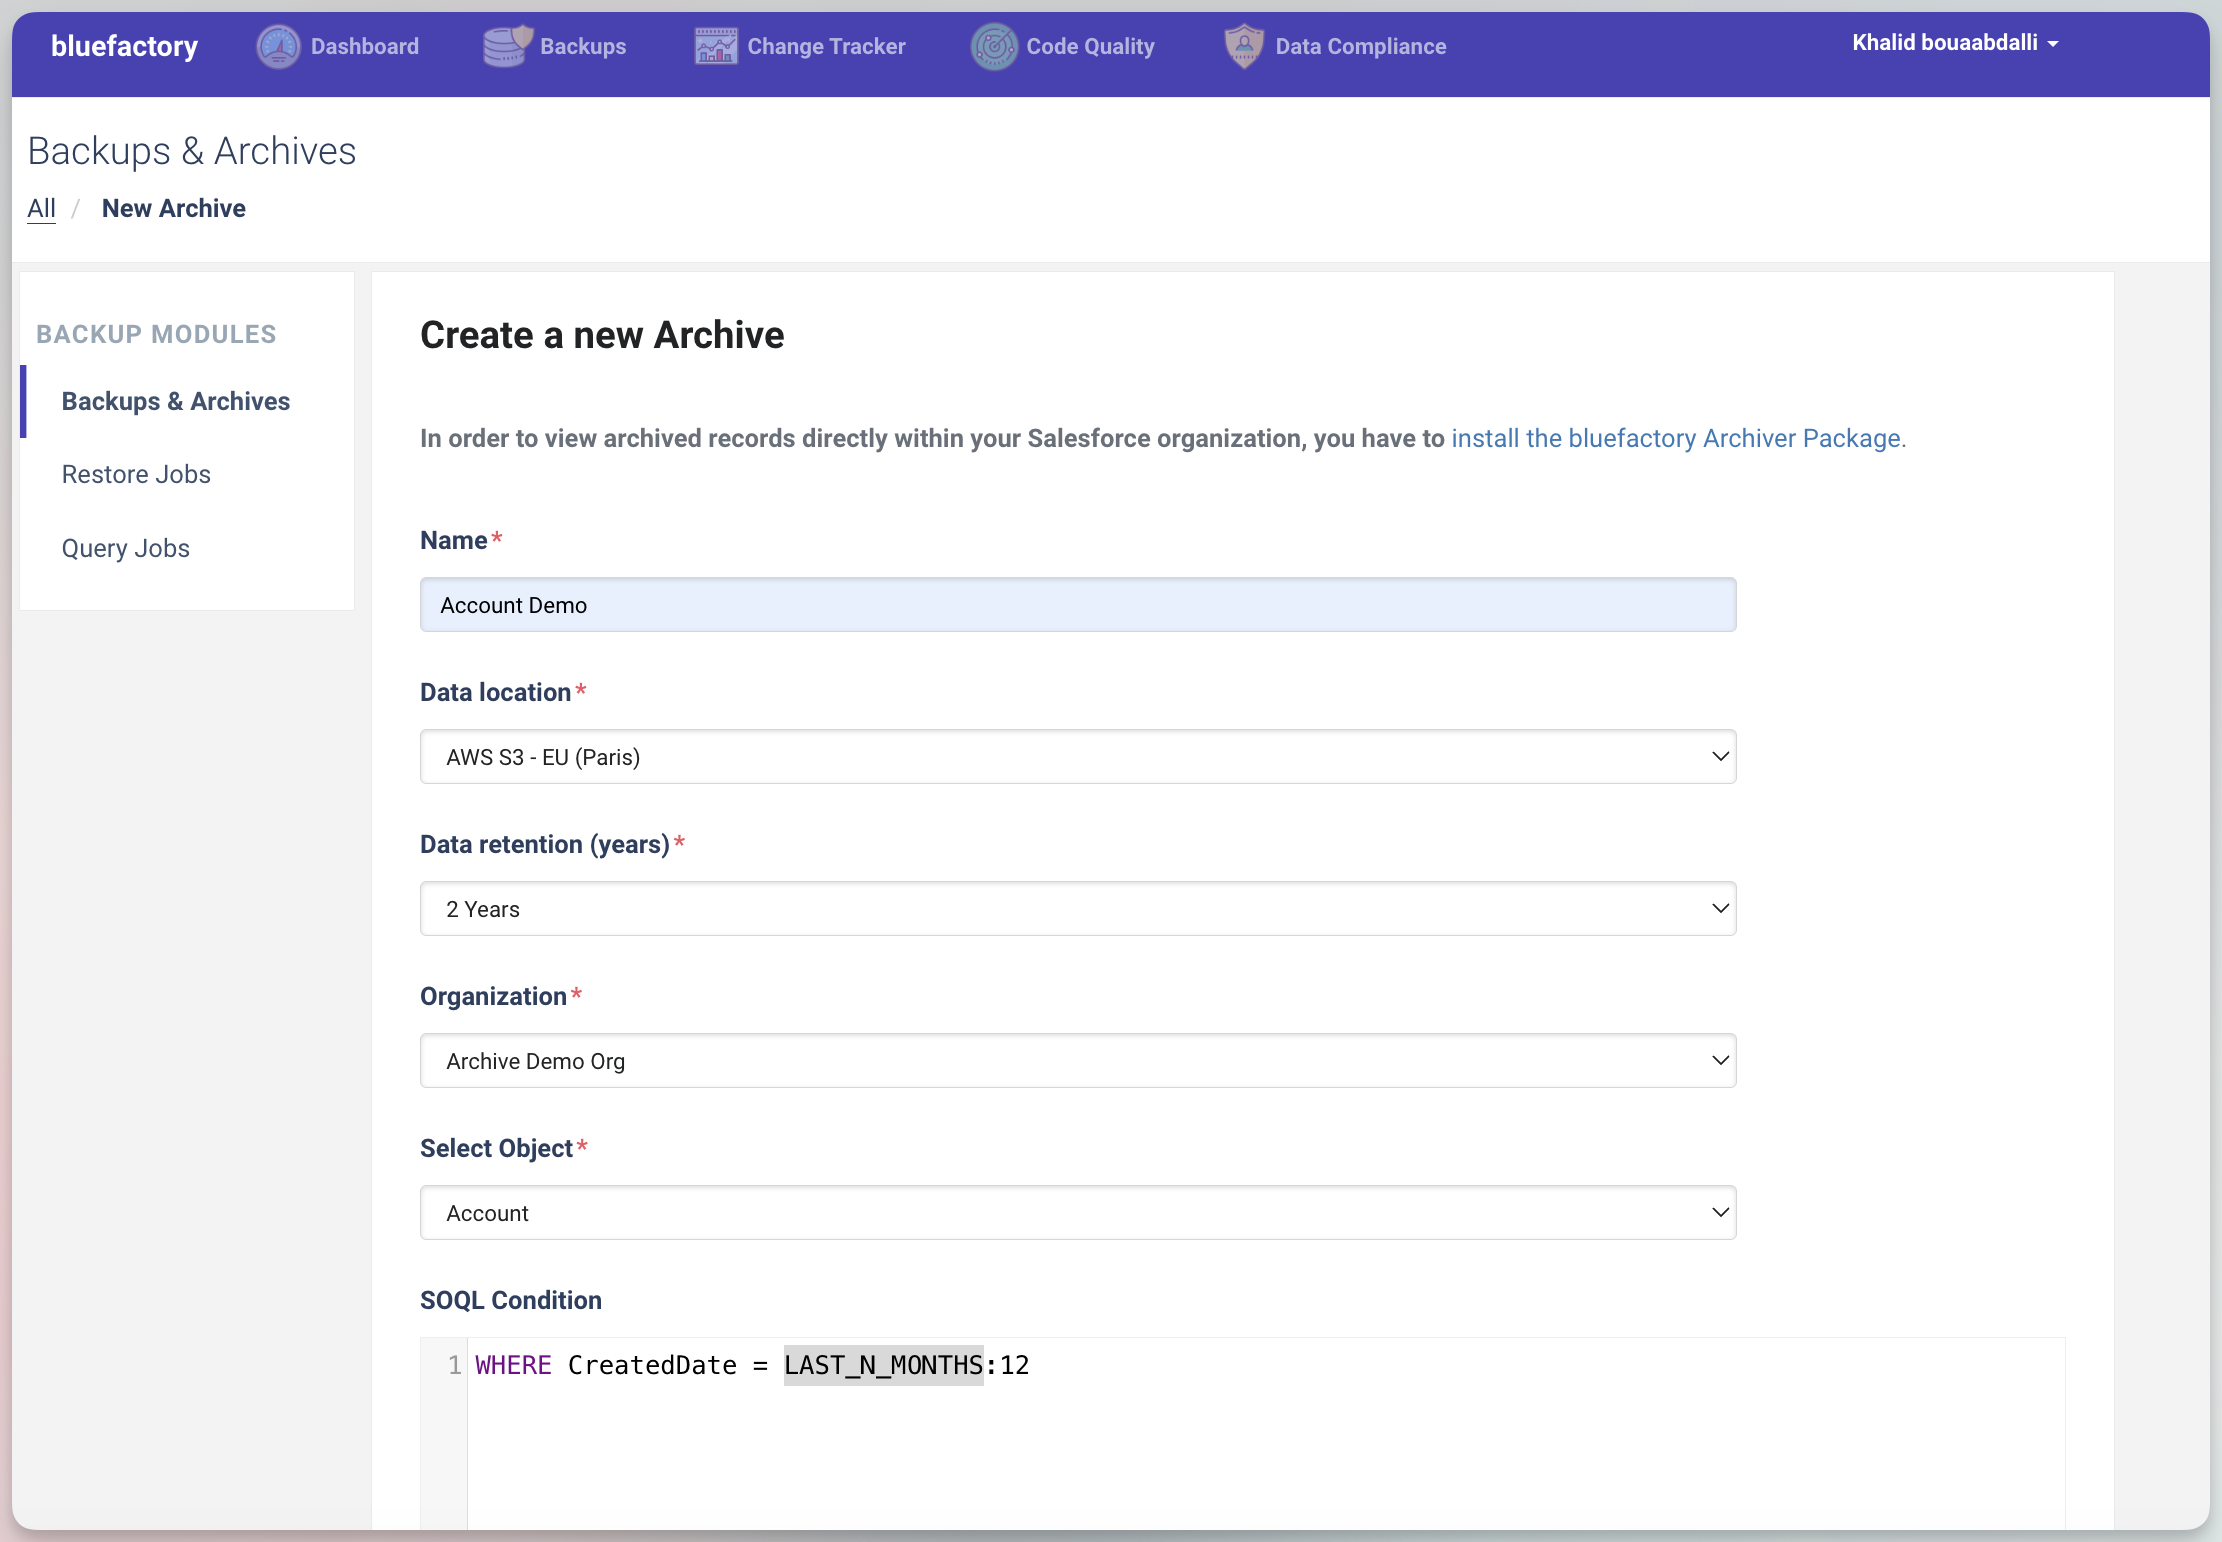
Configure the data you want to archive:
- Name: Archive Name
- Data location: Where your data will be stored
- Data retention (years): For how many years the data will be stored
- Organization: Select your Salesforce organization
- Select Object: Select the object you want to archive
- SOQL Condition: Select the scope of the data you want to archive using an soql condition
6. Sync Archive Objects
After creating an Archive Object, you need to synchronize it with the Bluefactory Archive Package. Follow these steps to do so:
- Select the “Bluefactory Archive” App
- Click on the Sync button
- Refresh the list.
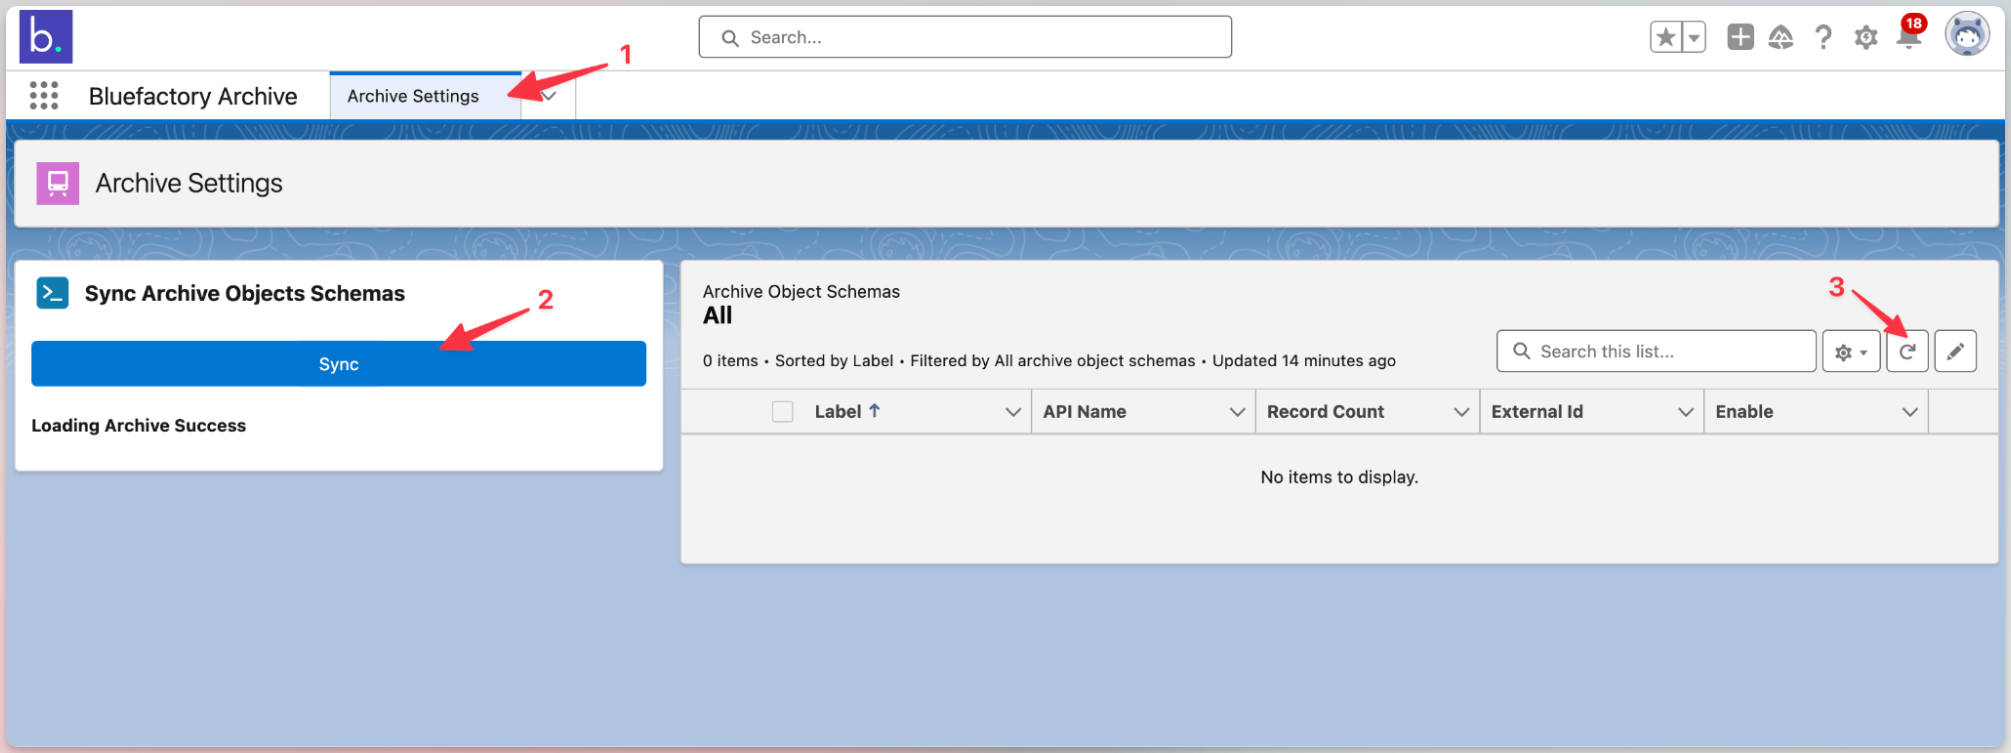
You should see all your archived objects. If the list is empty, check if you have already created a archived object.
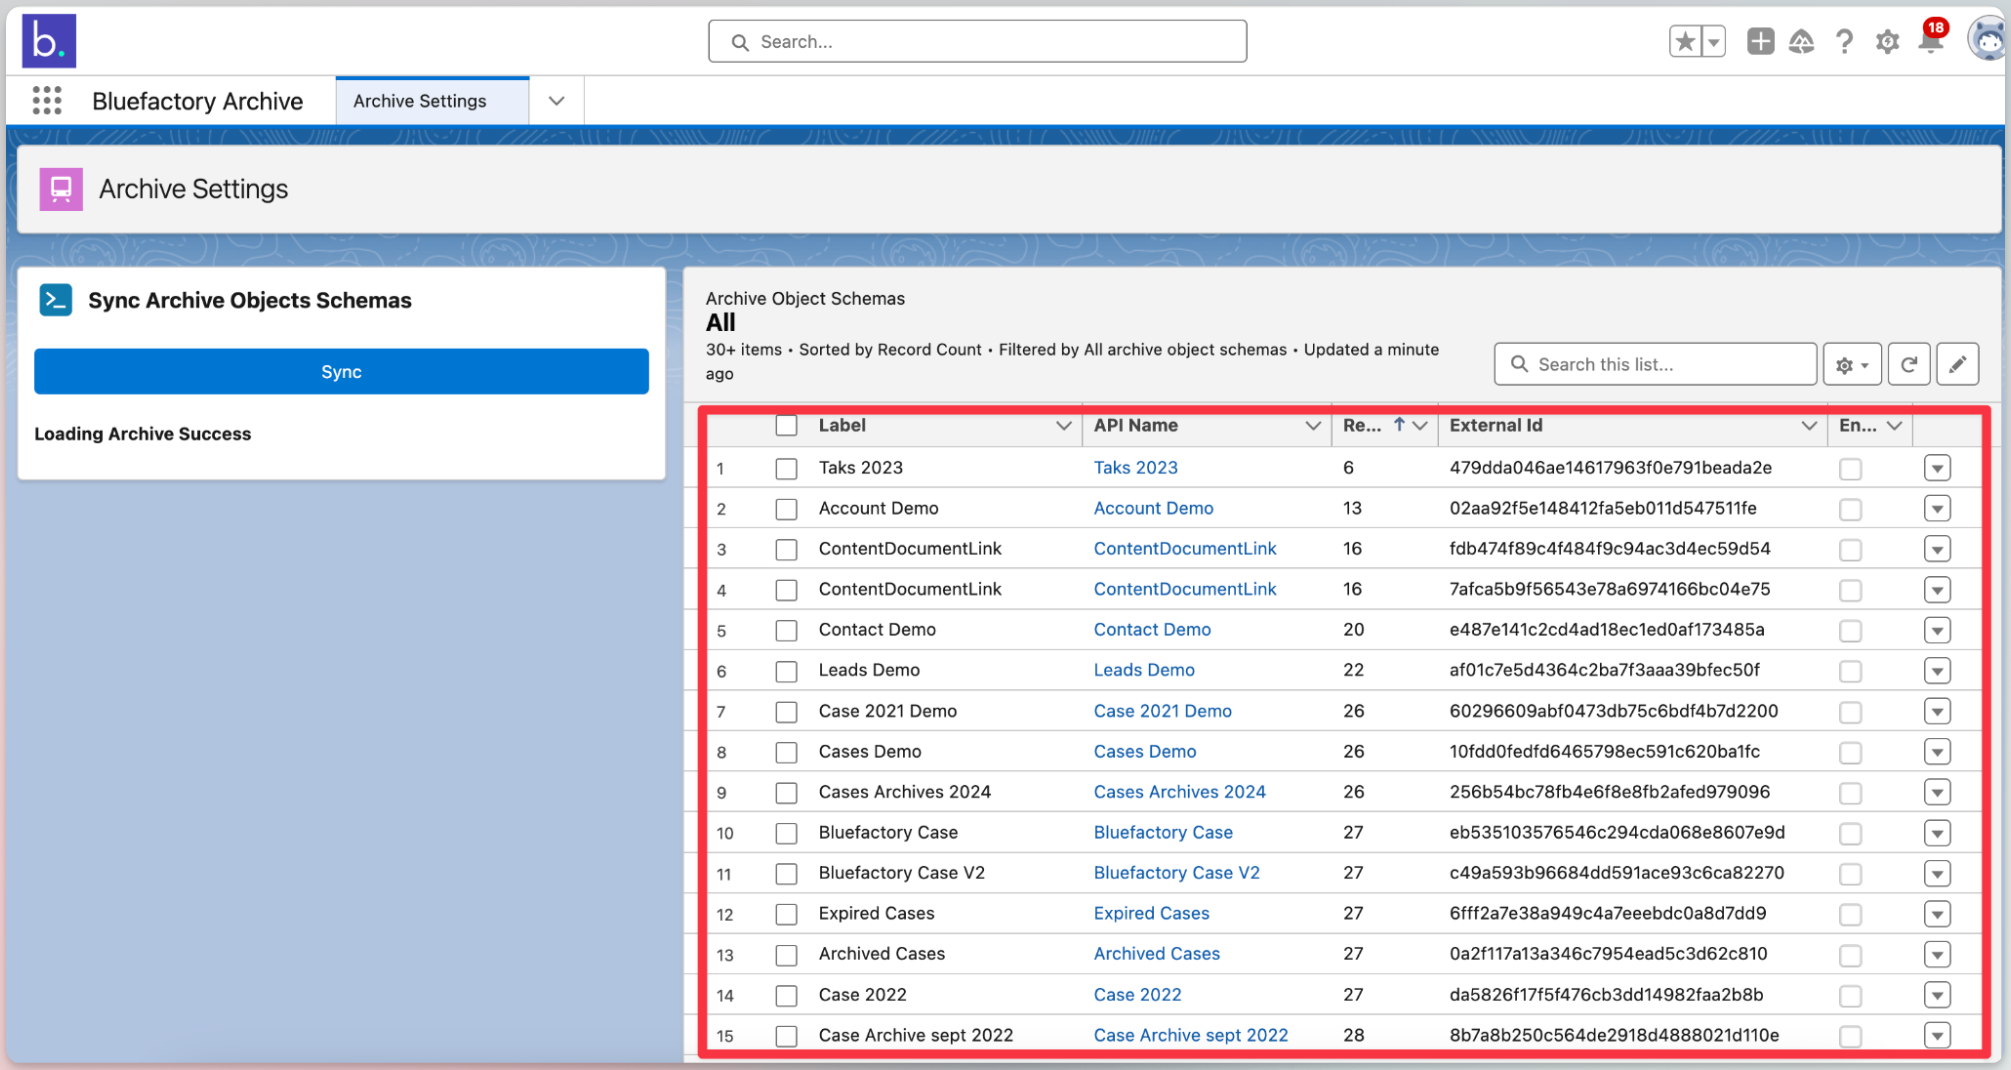
7. Configure an Archive Object
This section guides you through activating and configuring archive objects, setting access policies, creating relationships, and using formulas within archived objects.
Activate an Archive Object
After syncing your archive object, follow these steps to activate and configure it:
Select an archive object, example “Account Demo”

Enable the archive object

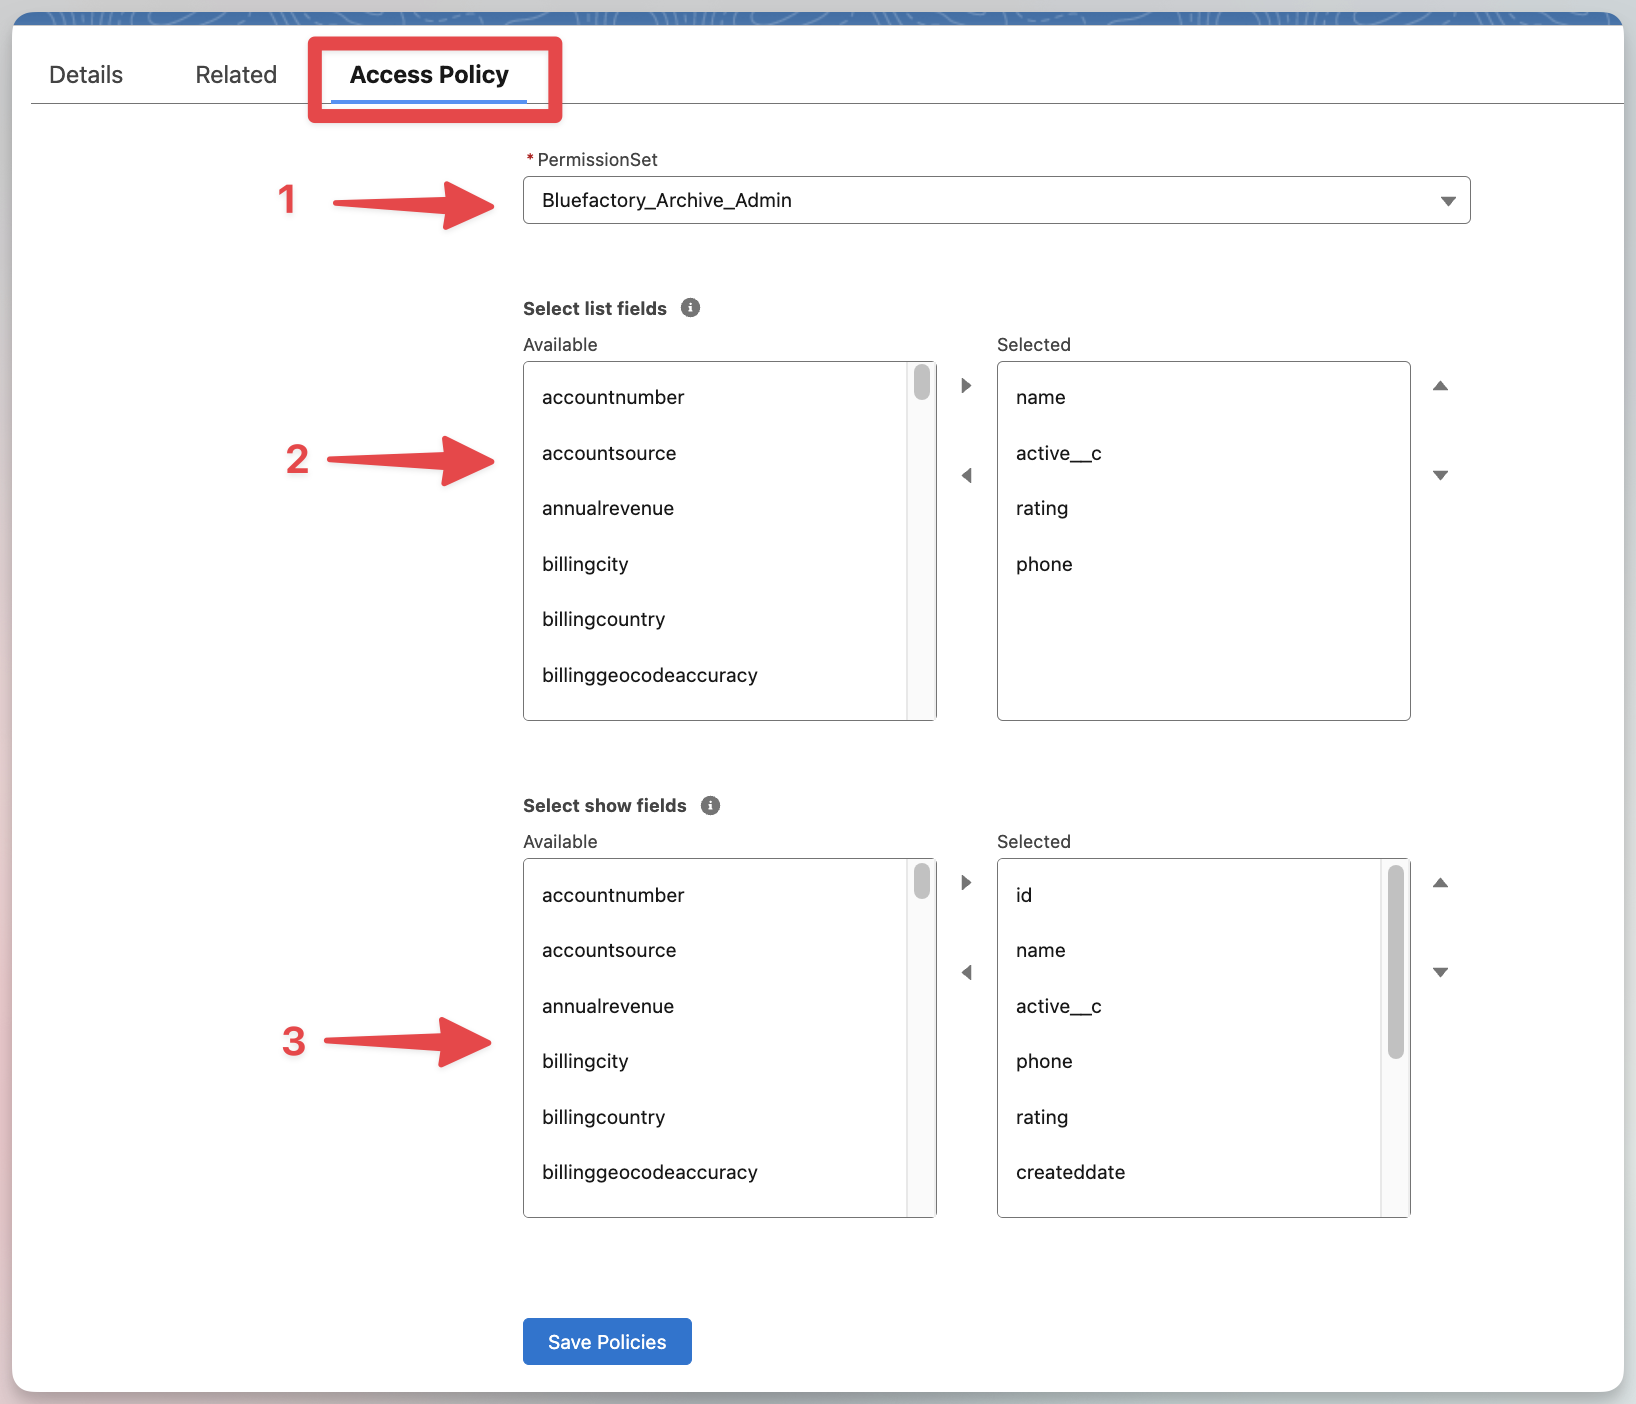
Configure the access policy: The access policy lets you define which group of users can see which fields. Create a different permission set for each group of users, and select the fields that you want to show to each user within the permission.
- Select a Permission set
- Select the fields that will be displayed in the list mode
- Select the fields that will be displayed in the detail mode
- Save
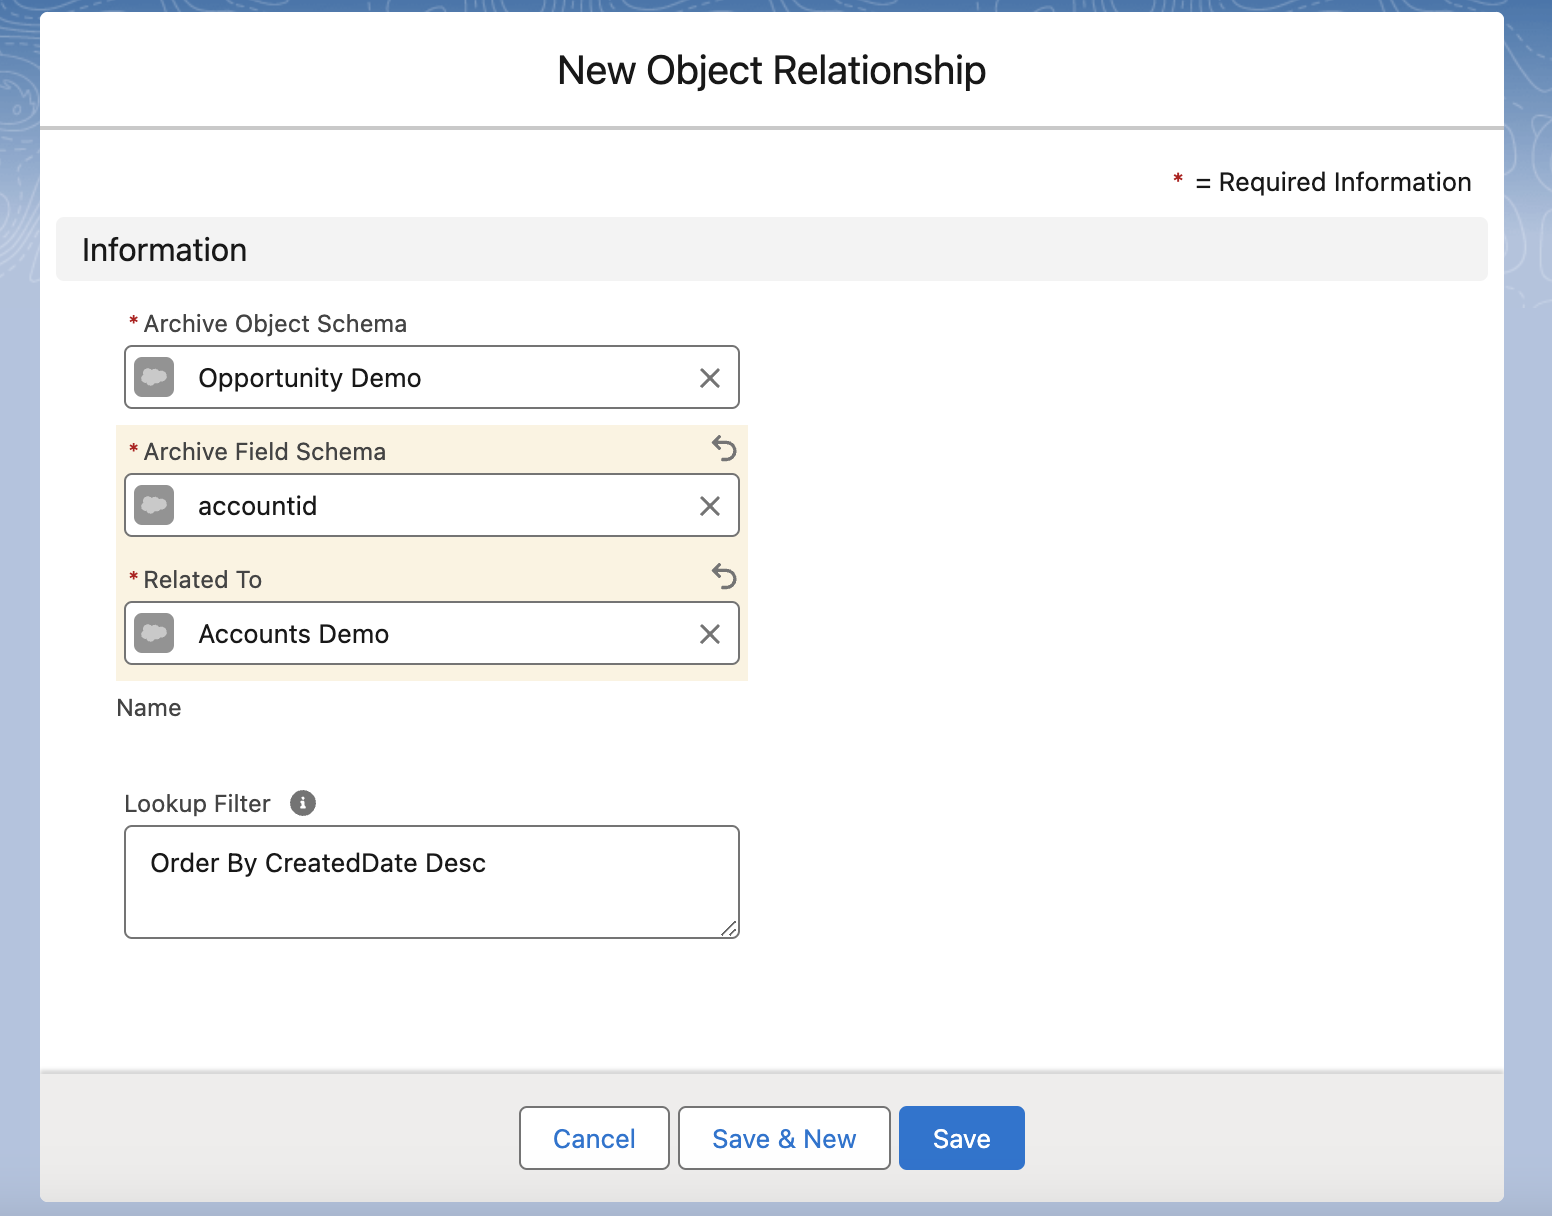
Create a relationship between two archived Objects
You can create relationships between archived objects, similar to Salesforce’s parent-child relationships. When a relationship is established, child records appear as related lists on the parent object’s detail page.
- Select an archive object, for example, choose “Opportunity Demo.”
- Cick on "Related" tab
- In the “Parent Relationships” related list, click New
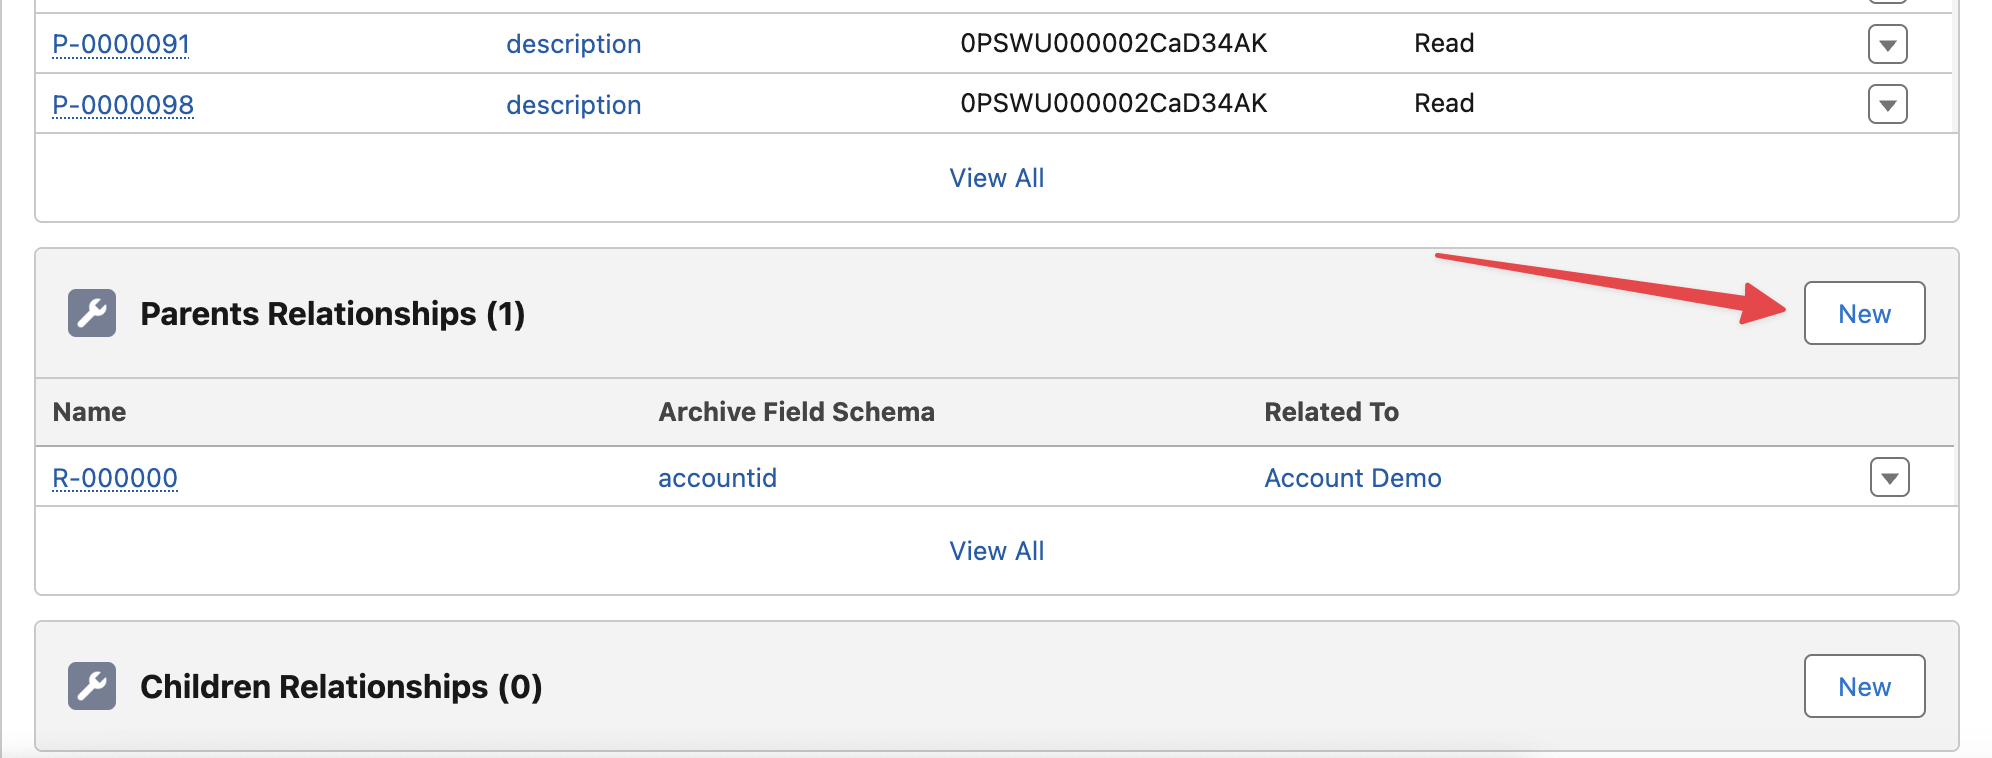
- Fill the form and Click on Save
Create a Formula
Formulas allow you to display meaningful field values instead of reference IDs. For example, show a user’s name rather than their ID for the “Created By” field.
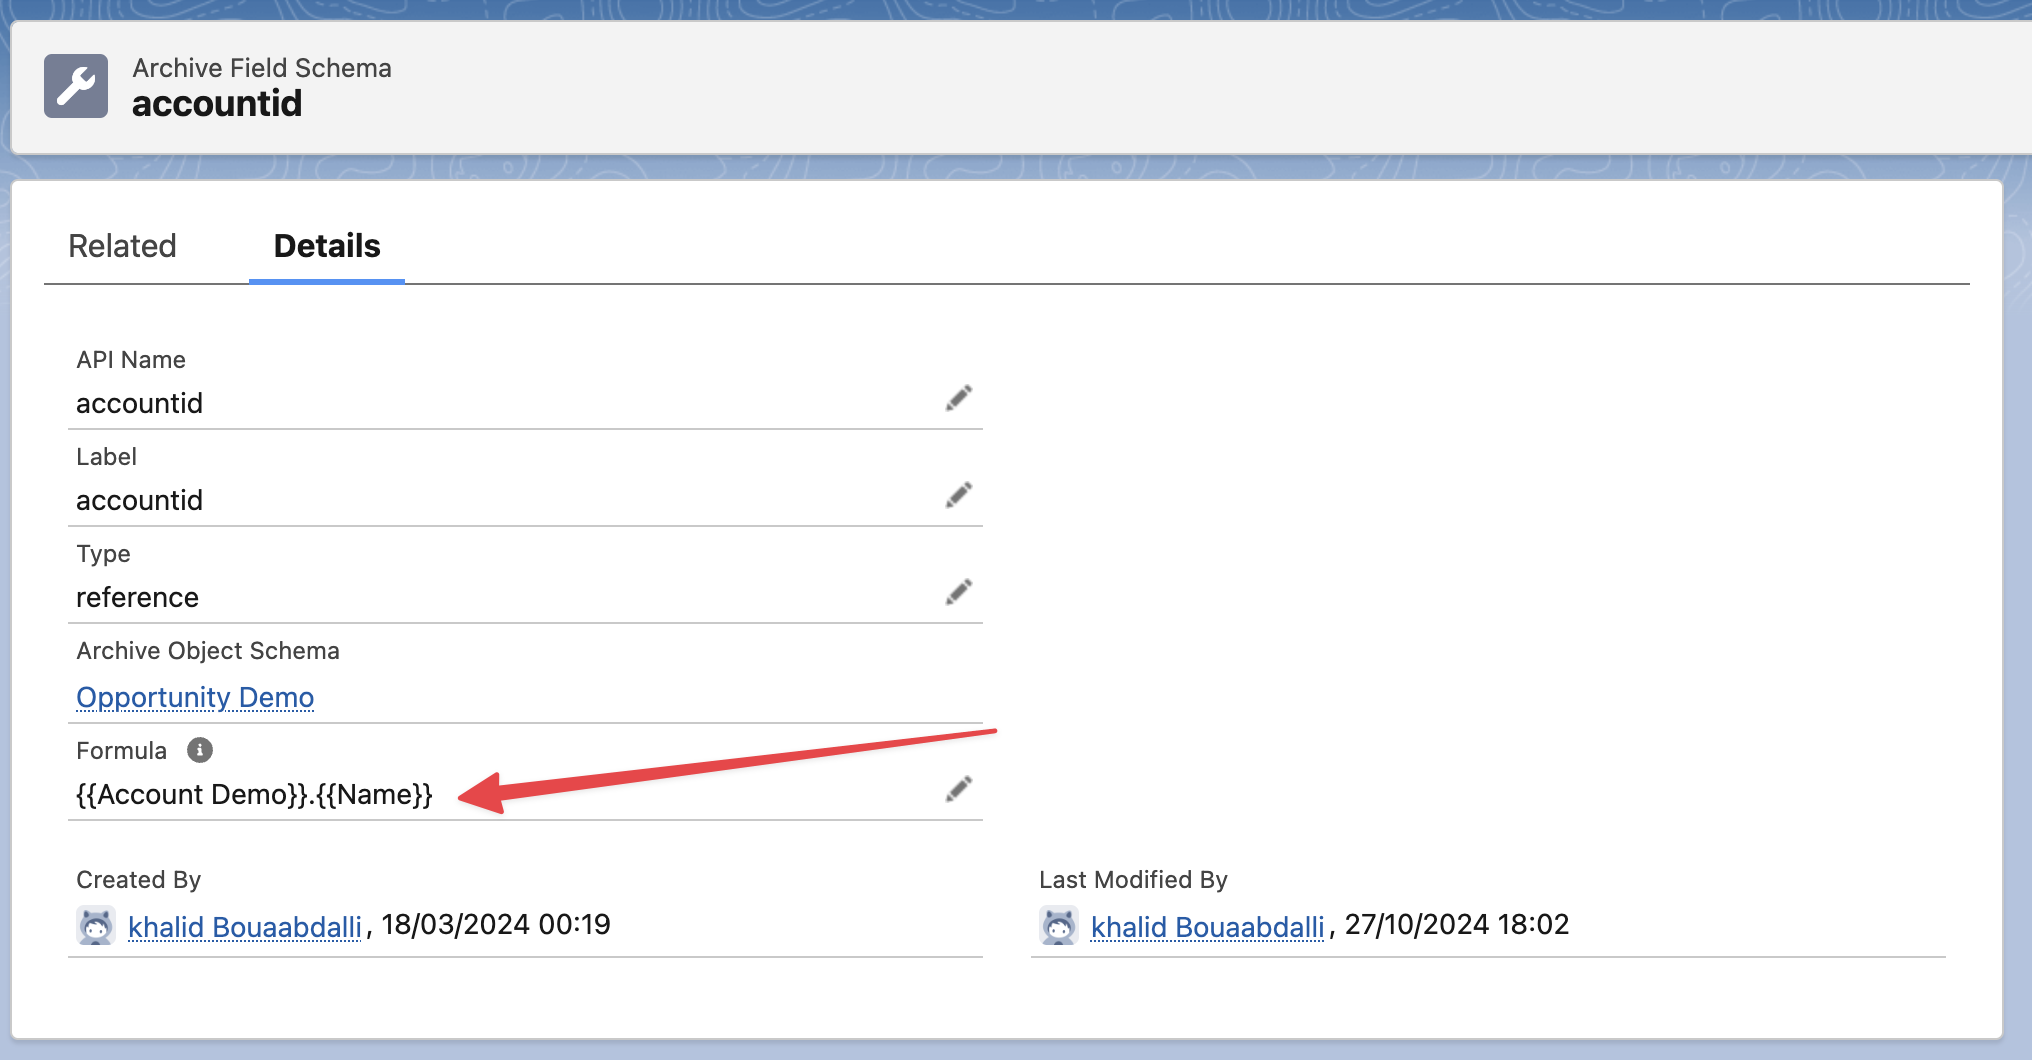
- Formula for Archived Objects
To create a formula that references fields within archived objects, use the following format: {{ArchiveObjectApiName}}.{{FieldApiName}}
Example: Display the Account Name for the field accountId: {{Account Demo}}.{{Name}}
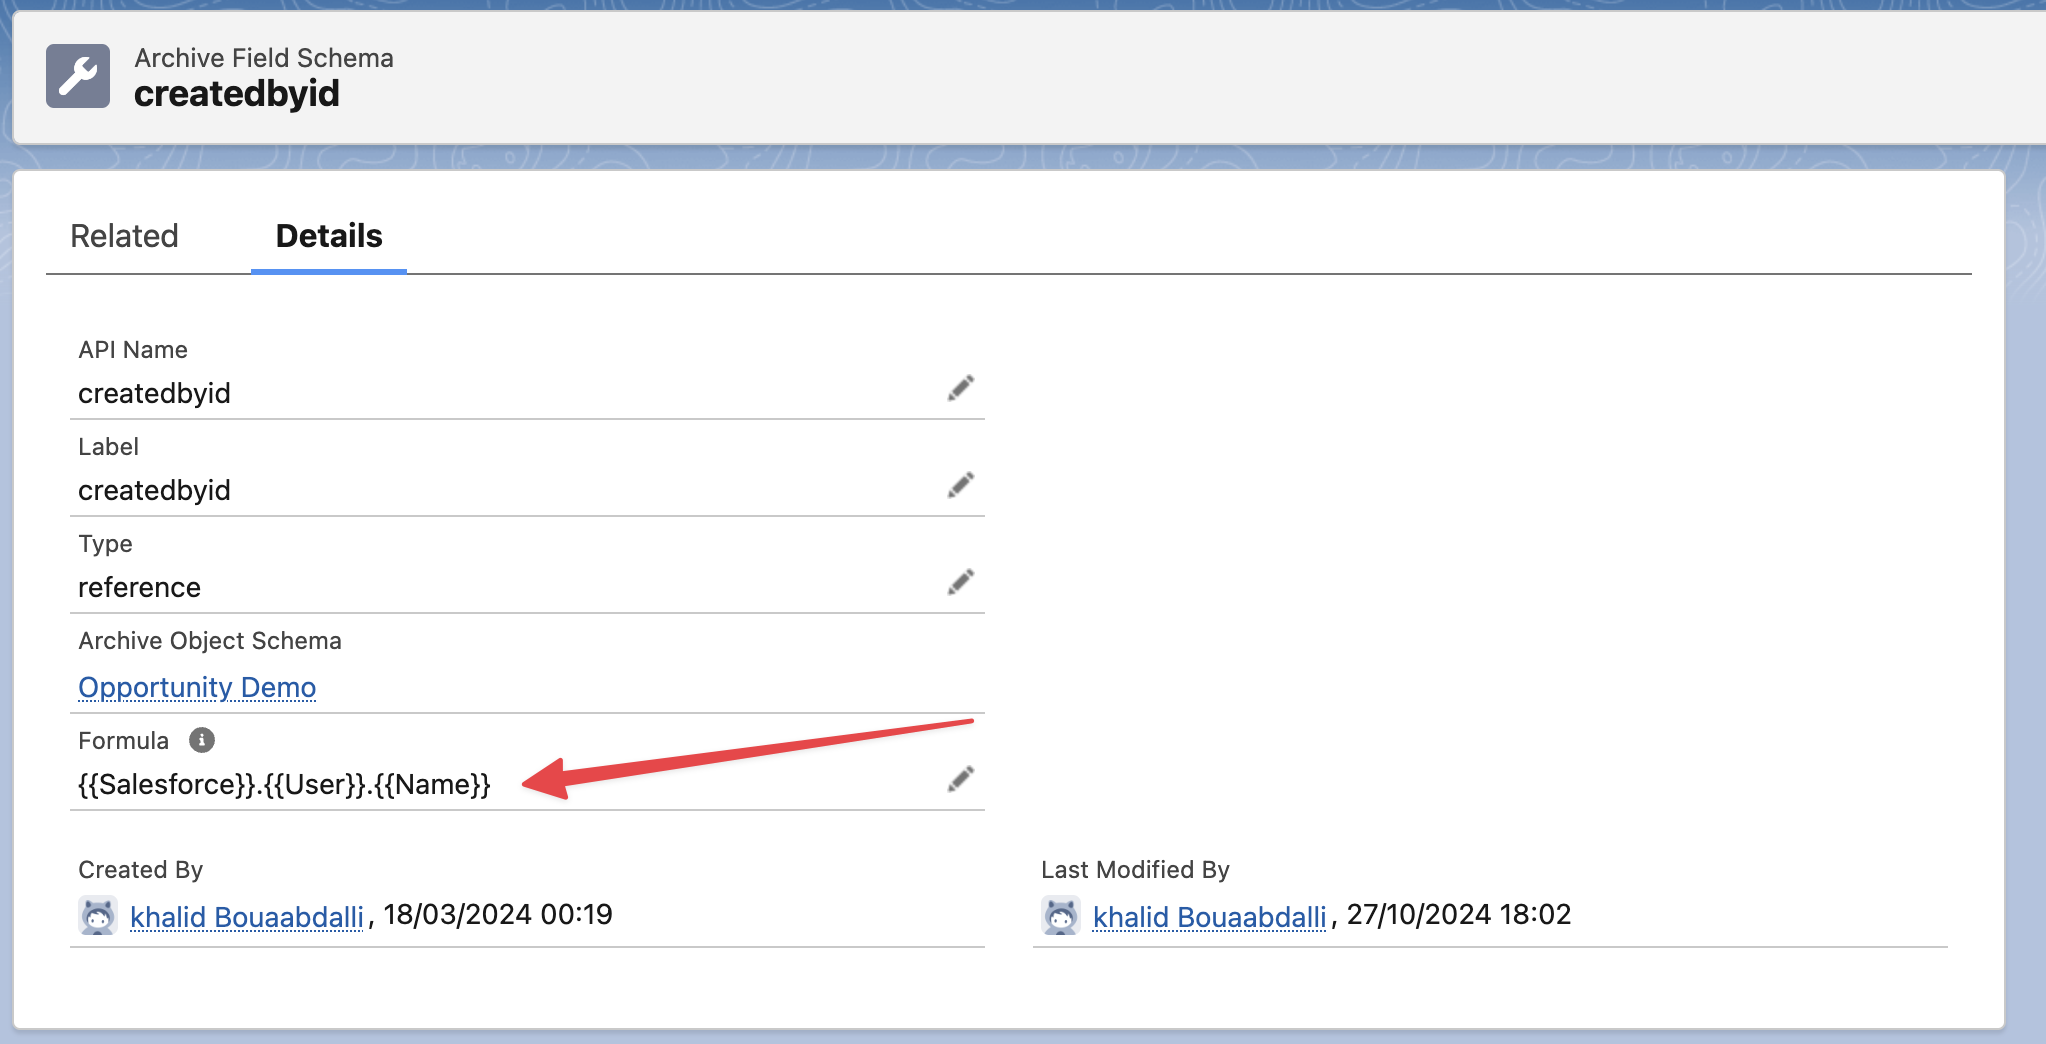
- Formula for Salesforce Objects in Archived Objects
To display a Salesforce object field value within an archived object, use this format: {{Salesforce}}.{{SalesforceObjectApiName}}.{{FieldApiName}}
Example: Display the User Name for the field createdbyid: {{Salesforce}}.{{User}}.{{Name}}
8. Lightning Pages Administration
This section covers the two Lightning pages required to display archived records:
- Archive Record Page: Displays the details of individual archive records.
- Archive List Page: Displays a related list of archived records.
Important
You must activate these pages to ensure archived records are visible.
Follow your Salesforce administration process to activate both pages and make them accessible to users.
9. Widget Administration
Widgets are Lightning Web Components that help you interact with your archived data. This section explains how to use the Global Search Widget and the Global Query Widget.
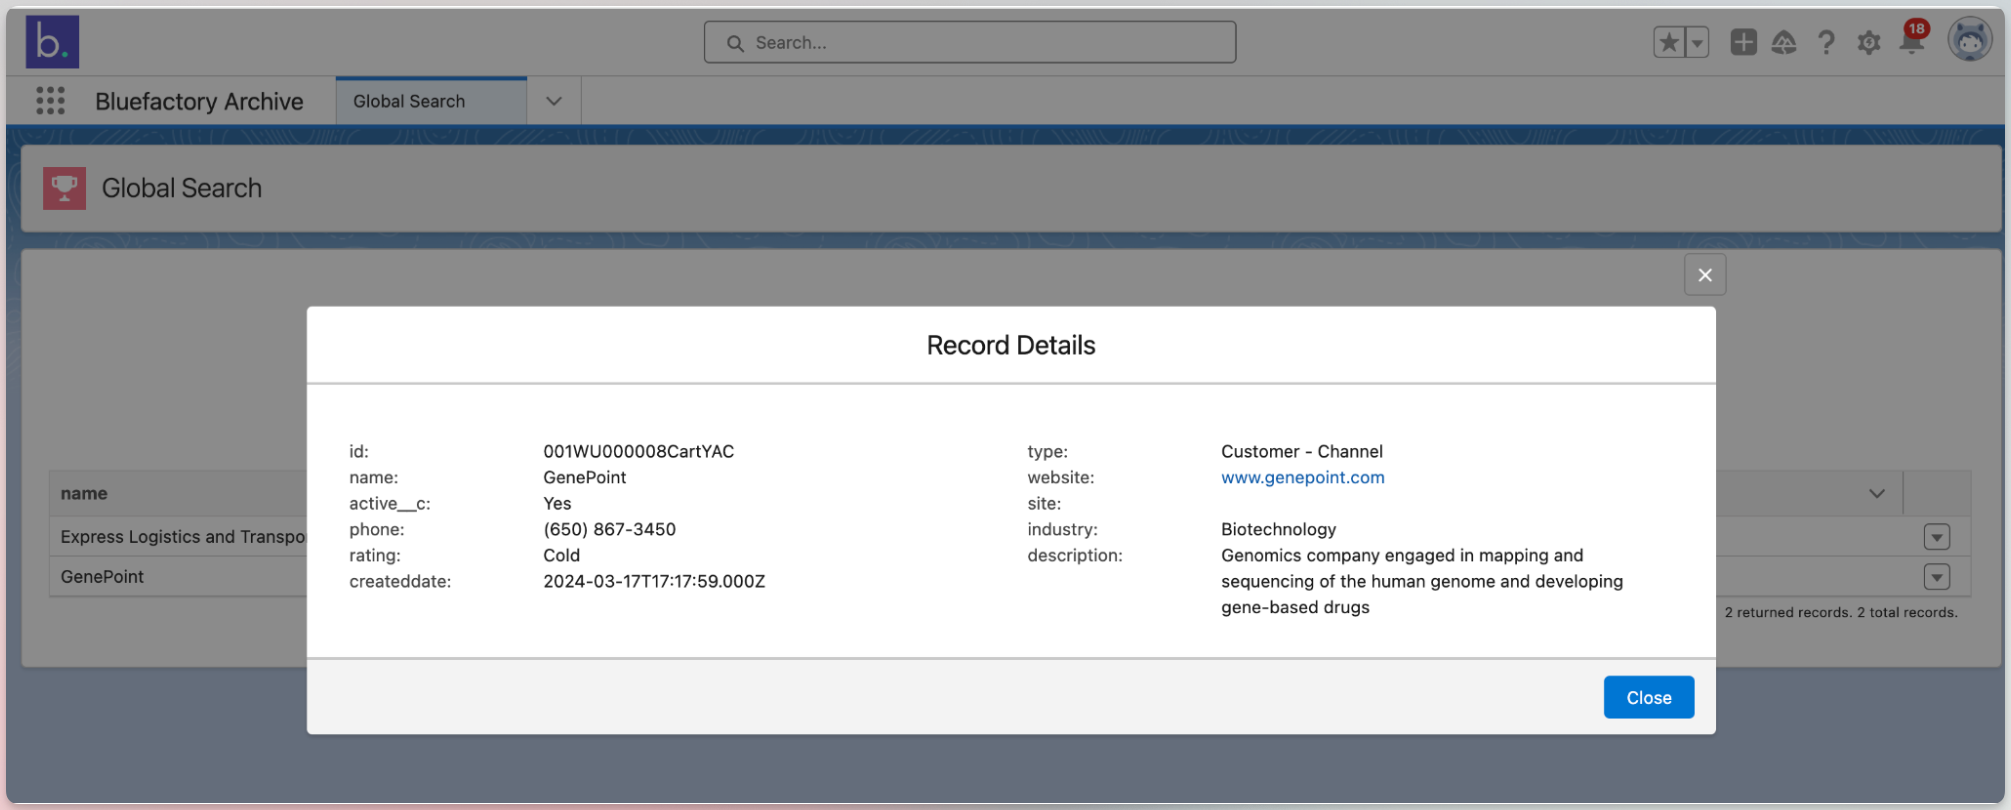
Global Search Widget
The Global Search Widget allows you to search through all indexed fields (id, string ,textarea, email ,combobox ,picklist ,multipicklist ,phone ,picklist ,reference ,url).
- Select Global Search
- Select the archive object and the search term
- See the search result
- Click on an archived record to see the detail

Global Query Widget
The Global Query Widget allows you to use a sql query to find archived records.
- Select Global Query
- Select the archive object and the sql query
- See the query result
- Click on an archived record to see the detail
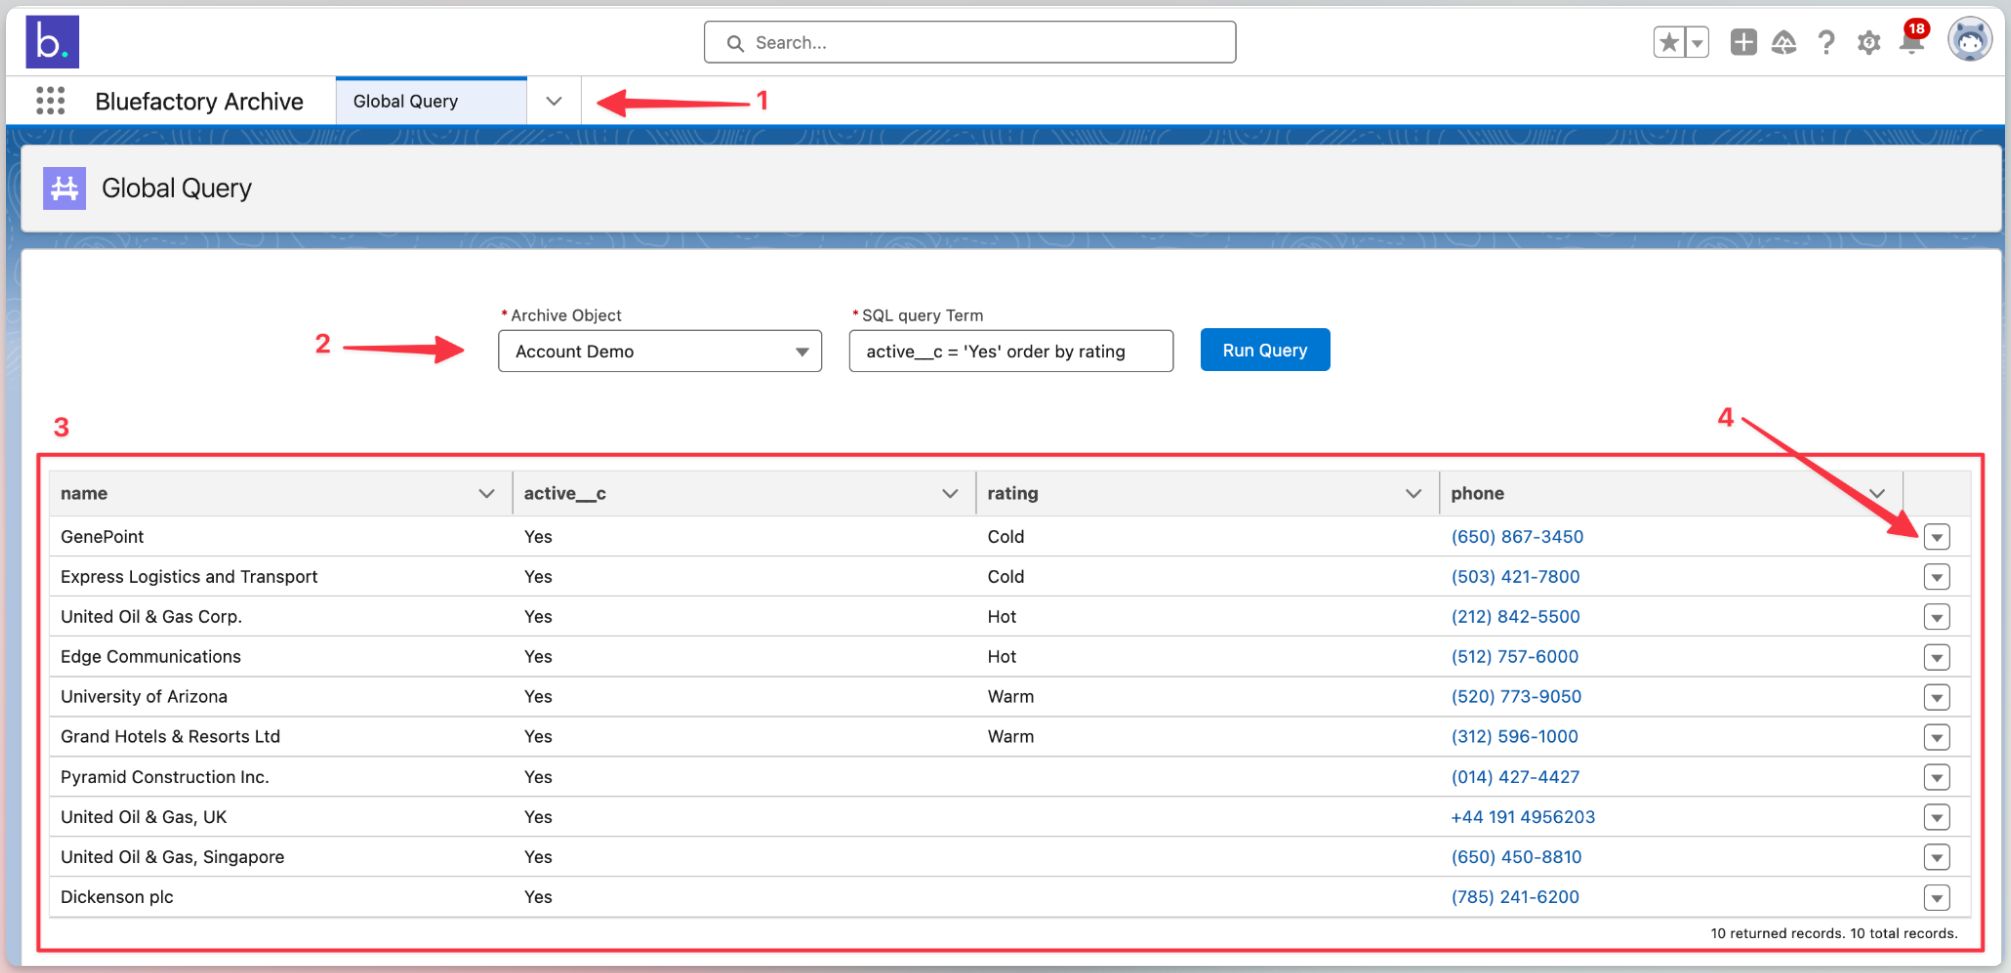
Adding the Widget to Lightning Page
The Archive Table widget allows end users to display the archived records in their chosen view.
- From the left menu, select the Archive Table component
- Drag and drop the component to the desired location.
- On the Archive Table menu, Select the archive object Name (example Opportunity Demo) and use the Filter field as a sql query with the record data as variable inside double brackets. For example: "AccountId = {{Id}} order by amount desc" : This filter means that the component will search for all records that have AccountId equals to the Id of the current record and order the result by amount.

10. Salesforce Experience Configuration (Previously Salesforce Community)
The archive widgets are compatible with Salesforce Experience. However, you must create two pages to display the archive records and their related lists properly. Follow the steps below to configure them:
Archive Record Page
Description: This page displays the details of individual archive records.
Steps to Create:
Create a new page:
- Name: Archive Record Page
- API Name:
archive-record-page
Add the component:
- Drag and drop the "Archive Record Detail" component onto the page.
Save the page.
Archive List Page
Description: This page displays a related list of archived records.
Steps to Create:
Create a new page:
- Name: Archive List Page
- API Name:
archive-list-page
Add the component:
- Drag and drop the "Archive Record List" component onto the page.
Save the page.
Update Custom Labels (If API Names Differ)
If you use different API names for the pages, update the corresponding custom labels to reflect the correct URIs:
- Experience_Archive_List_Page_URI
- Experience_Archive_Record_Page_URI
Make sure the URIs in these custom labels point to the correct pages for smooth navigation within the Salesforce Experience.
11. Troubleshooting
If you encounter any issues during the installation process, check the following:
- Make sure you have created a permission set and assign it to your user.
- Check that you have entered the correct Named Credential information.
- If you're having trouble syncing Archive Objects, make sure you have created an Archive Object first.
If you're still having trouble, contact Bluefactory support for assistance.